
D2R Solo Necromancer Leveling Guide
27.08.2023 - 12:49:42
D2R Gameplay Guides , Diablo 2: Resurrected , Game Guides

This guide is going to be able to give you valuable information and strategies so that you will be able to efficiently level a Necromancer whether it be in Ladder or Non-Ladder. This guide is going to go into specifics but should remain as a guideline to help you determine what you think the best way for you to level in D2R is. D2R is a constantly evolving game so make sure to always be open to learning.
Mainly this guide is going to teach you how to be able to optimize your skills. Some skills are only good when they scale and some skills don’t scale so well, although they can assist you in leveling. We are also going to be tackling the stats so that you will be able to transition through your gear efficiently. Hopefully, by the end of this guide you are going to be able to breeze through the game as a Necromancer, overcome an area where you were stuck, or improve your leveling strategy.
Skill & Stats
Skills distribution:
Stats distribution:
Respec
This is going to be done by level 26
Max out in Order
Important note:
For your attributes you just need to allocate enough Strength so that you will be able to wear all of your gear. Then dump the remaining Stat Points into Vitality. From Levels 39-75 you are going to want to put all your attribute points into Vitality. With the exception of changing gear if ever.
Progression & Leveling:
Levels 1 - 13
In the early parts of the game you are going to want to spend your points in Teeth which is going to be your main damaging skill through the early stages of the game. You will also want to spend a point into Clay Golem this is going to assist you a little but you are going to be using Teeth more often to clear monsters.
When you reach the Black Marsh area this is the time you are going to want to farm the Countess for runes that you will be using, make sure to collect all dropped gems. The runes that you are going to want to get from her are 1 Tal & 1 Eth rune. While you refresh the Countess you are going to want to reset Charsie to see if she has a good bases, preferably a (2)Leather Armor so that you will be able to socket your Tal & Eth make sure that it is in that order to be able to create the rune word Stealth. You will also want to find a (2) Skull Cap and save it for later.

While you are farming and have extra Tir runes you will want to socket them in any (2) Cap. This is going to allow you to be able to spam Teeth more often since Tir gives mana on kill.
Now you are going to want to spend your points into Amplify Damage so that you will be able to add into Iron Maiden. Amplify Damage is going to help your companions like your Clay Golem or a mercenary.
Iron Maiden is going to work in tandem with your Clay Golem. Your Clay Golem is going to run in and deal damage and take hits, which is going to reflect back because of Iron Maiden. This is going to be an easy way to clear the bosses. Re-summon Clay Golem when it dies and always apply Iron Maiden.
If you are lucky enough to find a wand with Iron Maiden then you won’t have to skill it, instead you can spend those into Teeth.
Levels 14-24
When you reach Act II buy a belt to be able to hold your potions. Now you are going to have the Horadric Cube which you are going to want to use so that you can re-roll wands. You are going to want to find + to Bone Spear. To be able to re-roll, just drop the Magic wand into the Horadric Cube and place 3 chipped gems and click combine.
Your goal is to get + to Bone Spear if you get others you can either sell it for more or re-roll them. You are going to want to save a chipped diamond to help you combine to an Io rune later.
Now when you reach level 17 you are either going to create Stealth or equip it if you have already made Stealth. This is going to boost your FCR (Faster Cast Rate), FHR (Faster HitRecovery), FR/W (Faster Run / Walk) and give you more Mana Recovery.
When you reach Act III you are going to want to shop for a BoneWand that gives + to Bone Spear and have (0) or (2)slots, make sure that it is a Bone Wand and disregard the ones with only one slot.
You are going to want to shop for this item at Ormus ideally you are going to want to be under level 18. The reason for this is because it is going to be easier for you to find it because it is going to have a red background. If you happen to be level 17 and not yet in Act III you can try your luck and buy this at Drognan.
Remember that it needs to be a Bone Wand, Non magic, + to Bone Spear, (0) or (2) sockets. Make sure you keep this for a rune word later on. Pick up any off-hand items usually in the form of Skulls and Shrunken Head make sure they give + to Bone Spear.
When you reach level20 in Act III you are going to want to buy a Staff of Teleportation. This is going to help you with mobility throughout the game. This staff can only be used at level 24 but we are going to be using the red background trick for this again. When you can equip the staff but it on your weapon swap and use it when you need to teleport around.
After you finish the two quests in ACT V you are going to receive the runes for Ancients’ Pledge (Ral, Ort, Tal). Then you are going to be able to slot items. If you found a bone wand with (0) slots then this is where you are going to use it. Now make sure to slot the Ancients’ Pledge in a (3) shield. You can buy a Kite Shield in ACT II from Farah.
Cow Level until 25-26
At this point you are going to be able to get access to The Secret Cow Level. You are going to want the EXP from this level and farm until you reach level 25. Make sure to utilize your Bone spear to be able to kill cows and start making corpses for your Corpse Explosion which is going to be your main killing mechanic in this area.
Don’t forget to destroy the Cow King! You will be able to kill him to your heart's contents without The Secret Cow Level closing on you.
You can also opt to farm Eldritch in the Frigid Highlands until you are 26 if you feel like the EXP from the cows is slowing down
Respec Level 26
You are going to want to respec when you reach this level. You can follow the table below:

Nightmare
Now that you have entered Nightmare your resistances are going to be lowered. You are going to want to get a belt, boots, and gloves that all give resistances. You should be prioritizing lightning and fire resistance. You shouldn’t have much trouble with your resistances now, especially with the Ancients’ Pledge.
While you are leveling you should prioritize maxing this out in order:
For The Countess in Nightmare you are going to want to farm the runes Dol, Ort, Sol, Io. Io is going to be troublesome to farm since it’s pretty rare. To speed up getting an Io rune you can place 3x Hel runes inside the Horadric Cube with a chipped diamond click combine and you will be able to get an Io rune.
Now you are going to want to create the Lore rune word by placing the Ort and Sol in that order inside a (2) non magic cap. This is going to give you +1 to all skills and lightning resistance. After this you are going to want to create the White rune word by placing the Dol, Io inside the (2) Bone Wand. This is going to boost your overall skill and even add up to +5 Bone Spear depending on the initial level of the wand.
After you clear The Ancients on Hell difficulty. You are going to want to spend a single point into Amplify Damage. The reason for this is because there are going to be enemies that are going to spawn Magic Immune and Bone Spear deals Magic.
You can use your Bone Wall to trap the monsters and cast Amplify Damage on them and kill the non Magic Immune monsters with your Bone Spear and using Corpse Explosion to finish the job. Since Corpse Explosion deals Fire and Physical it’s going to assist you in dealing with the Magic Immunes.
Gear Options or Alternatives
Here are some gear alternatives that you are going to be able to use instead of certain items, if you are lucky enough to find them or already have them in your storage from another character.
Instead of Stealth you can use:
+1 To All Skills, 30% Faster Cast Rate, All Resistances +20-35 (varies) Huge increase from Stealth.

Another good equipment for your gloves slot is:
The +1 To Fire Skills, and +20% Faster Cast Rate is going to greatly boost your Corpse Explosion kill time.

Another good equipment for your shoes slot is:
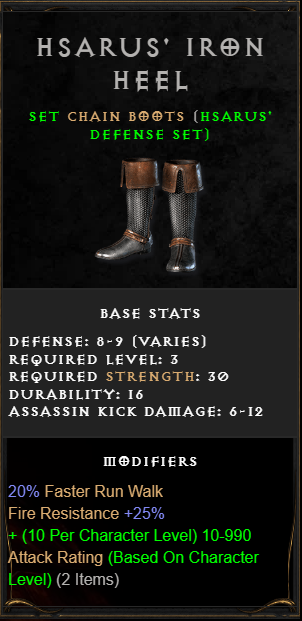

This is going to give you better Faster Run Walk and Fire Resistance +25% for the Hsarus’ Iron Heel.
For your Ring slots you can have many options but for starters you can go for:

This is going to give you mana boost and +1 to all skills.
Another alternative for your Ancients’ Pledge especially if you already have resistances is:

This is going to be more offensive since it’s going to reduce resistances but it comes with the plus to FCR and the +1 to all skills.
A powerful offhand that you can have is

It gives +2 all Necromancer Skills and +40 All Resistances.
Lastly, for your amulet you can opt for anything that gives + to skills like:


Mara’s Kaleidoscope also give All Resist + 20-30
Conclusion:
The Necromancer is going to be a fun character to play in the early stages while you are using Teeth, and you will be breezing through the game with Corpse Explosion. You are going to have a lot of fun leveling this character andtrivializing most of the game. As an endgame character you can transition her into a Summon or Fishymancer. By then he is going to be powerful enough to solo most areas and be able to farm for his own gear. All in all the Necromancer is a good character to focus on and level for someone who likes to clear content and likes to sip coffee while his minions do the work.

![Stealth [Runeword Runes Pack]](/img/tmp/product_mini_2_41271.jpg?time=1736927289)
![Skin of the Vipermagi (Ladder) [Armor]](/img/tmp/product_mini_2_45183.jpg?time=1736927289)
![The Stone of Jordan (Ladder) [Rings]](/img/tmp/product_mini_2_45499.jpg?time=1736927289)
![Homunculus (Ladder) [Shields]](/img/tmp/product_mini_2_45532.jpg?time=1736927289)